asus router firewall setup
Several users don’t know of the fact that the ASUS router can also serve as a firewall in their network protecting their device from malicious bugs. Enabling a firewall in your device is a smart way to secure your ASUS router from malicious threats and bugs present in the network. Enabling the firewall in your router is considered the optimum action, as the bugs in your network damage the operational level of your router and can slow the functionality of your router. A user can enable or disable the firewall with the help of the web interface of a www.router.asus.com window.
Steps to enable the firewall protection in the router.asus.com
- Open a browser on the laptop or computer connected to the home network.
- Take your cursor to the address bar and type www.router.asus.com on the web address to get to the default ASUS router login window. A user can also type the LAN IP address of the router on the address bar. The IP address of an ASUS router is 192.168.1.1
- Hit the enter button and you will be redirected to the ASUS router login page.
- Mention the credentials on their respective fields. Type “admin” on the username tab as a username credential and type the password you type earlier while logging into the router.asus.com window. If you haven’t changed the default password, type “admin” as the default password. Both the login fields are case-sensitive
- Click on the login tab and you will be redirected to the main dashboard of the ASUS router.
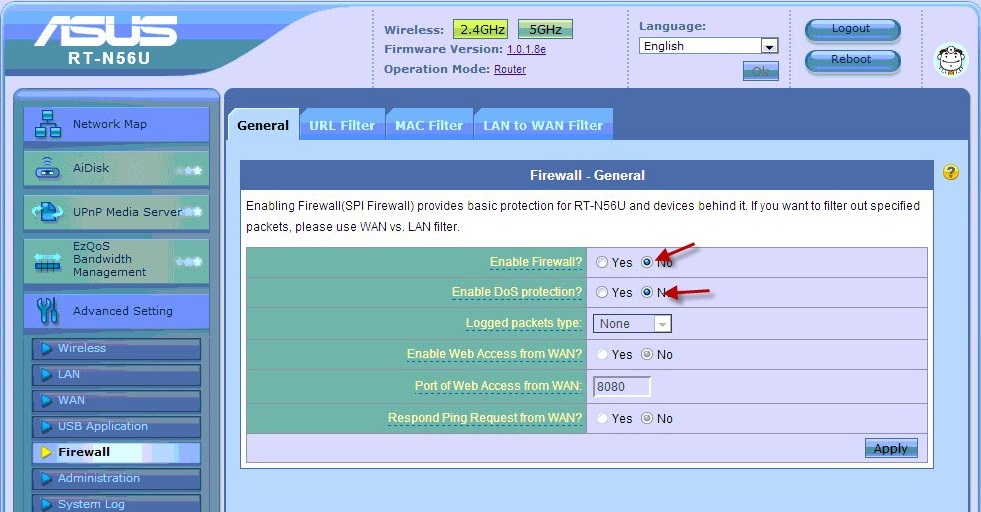
- Locate the Advanced settings tab, select it then click on the Firewall tab, and at last click on the General tab.
- As soon as a user clicks on the General Tab, search the Enable Firewall option. Take your cursor to the Enable Firewall field and select the Yes option.
- If a user wants to protect his network from the DOS attack then go to the Enable DoS protection option and click on the Yes tab. You can enhance the router’s performance by preventing the (Denial of Service) attack.
- With the help of a firewall feature, a user can also monitor data packets exchanged between the Wide Area and Local Area Network. Select the Dropped, Accepted, or Both option from the Logged Packets type.
- Click on the Apply button when you are done configuring the above settings. Now, your router will in the protection of the firewall.
Note: You can disable the firewall if enabling it is resulting in denying you from accessing the router.asus.com window. A user can disable or enable the firewall by visiting the web interface of the ASUS router. A user can also change the URL he is using to get the default ASUS router login window. You can type 192.168.1.1 or 192.168.1.1 as the web address of your browser to reach the router.asus.com window.
How to restore the saved settings into the router.asus.com device?
The need of creating a backup of the current configuration settings is done when a user is about to reset or update his router. During the reset process, a router is being restored to the default settings and during the update process, a new firmware is being uploaded to the router.asus.com window. In the reset process, all the configuration settings get erased but during the update process, only the settings which are mentioned on the release notes get removed from the router.asus.com window. The user is advised to create a backup of the configuration settings before both the reset or update process.
Steps to restore the saved settings into the router.asus.com device
- Open a web browser on the computer connected to the Wi-Fi network.
- Type www.router.asus.com or the IP address of your ASUS Router on the web address of your browser. As soon as you, click on the login tab and the home screen of routerlogin.net appear on the screen.
- Hit the enter button and the ASUS Router login page appears on the screen.
- Enter “admin” on the username tab as a default credential and mention the password on the password tab. In case, you haven’t set the password yet, type “password” on the password credential.
- Click on the login tab and the home screen of routerlogin.net appears on the screen.
- From the main dashboard, go to the Advanced settings tab, then click on the Administration tab then click on the Restore or Save settings tab.
- Now, select the task that you want to perform
- If you want to restore the default settings into your router then click on the Restore button and all the current settings will be converted into the default one.
- A dialogue box appears on your screen asking for your confirmation. Click on the OK tab to confirm your action.
- Now, if you want to save the current settings, click on the Save tab then navigate your cursor to the folder where you want to create a backup of your configuration file. Make sure that the location where you are saving your file is easily accessible so that while restoring the configuration settings you can easily access it.
- If you want to restore the configuration settings of which you have created a backup. Scroll down to the page and click on the Upload tab. Navigate your cursor to the location where you have kept the saved file.
- Click on the Open button and then the upload process begins. The process will take a few minutes and when it's done the saved configuration settings will get restored in the router.asus.com window.
Note: IF there is any issue in the current configuration settings of the router.asus.com window, then perform the firmware update in your router. Configure new settings in your router, do not create a restore to the saved settings. Also, avoid restoring your router to the default settings. Keep the location where you have kept the saved configuration settings confidential so that no one can access it as it could harm the performance of your router.\